
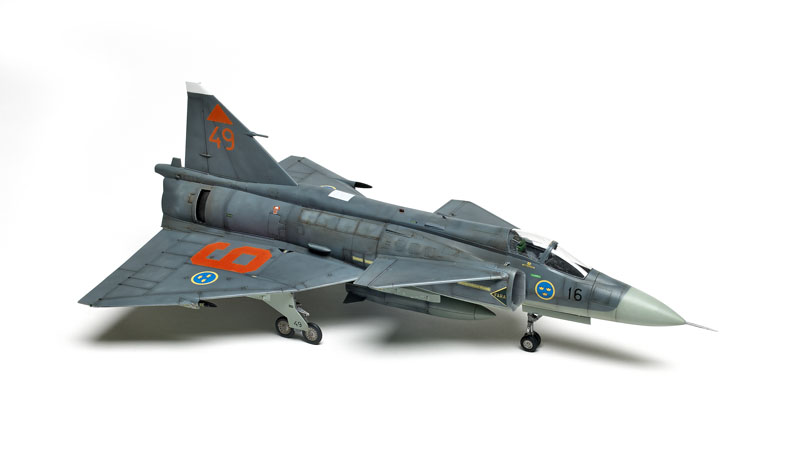
Seeking a fighter capable of operating from short, improvised airstrips, Sweden turned to the Saab 37 Viggen. The delta-wing aircraft featured large canards to aid low-speed handling. The turbofan engine was equipped with a thrust reverser, allowing the aircraft to back up under its own power.
The Viggen served the Swedish air force in attack, fighter, and reconnaissance roles from the early 1970s until the 2005.
For years, the only 1/48 scale Viggen was an ESCI kit from 1982. (It’s been reissued by Ertl, Revell, and Airfix over the years.) Raised panel lines and poor interior detail required a lot of TLC to turn it into a showstopper.
Sweden-based Tarangus is a natural choice to produce an all-new Viggen. Its previous releases included the Saab Lansen and Safir in 1/48 scale, and a Tunnan in 1/72 scale. Those were short-run kits; the Viggen is not. Tarangus delayed the kit’s release in its determination to get it right. And, for the most part, it has.
Note: There are a couple of errors in the instructions released with the first editions of the kit, but Taragus has errata on its website.
This initial release is the JA 37 all-weather fighter version.
The gray plastic features sharp, engraved panel lines. Sprue attachment points are small and I saw no sinks or ejector-pin marks. Molded locators aid alignment.
Features include: full intakes all the way back to the fan; good exhaust detail, with separate thrust-reverser petals; and a well-appointed cockpit with a decent representation of the Saab ejection-seat, although no harnesses are included.
The cockpit goes together quickly and fits neatly into lines engraved inside the upper half of the forward fuselage. Check reference photos on Tarangus’ website (http://www.tarangus.se/all-new-viggen-model/reference-gallery-JA37-viggen/) for details of painting the seat and instrument panels.
One word of warning: The seat appeared to fit fine when I installed it in Step 5 but interfered with the canopy in Step 31. After removing it, I discovered the base is a mite too wide to fit all the way down into the tub. I sanded the lower edges until it sat firmly on the floor. Also, pay attention to part numbers; the kit includes a tub and instrument panel for earlier Viggens, and they look similar. (On the upside, the presence of these parts and the shorter tail indicate an AJ 37 is likely on the way. An extra seat and controls mean we might get a two-seat SK 37 trainer.)
It’s clear the designers know the aircraft. To accommodate the uprated engine of the JA 37, Saab extended the fuselage by 10cm between the canard and wing. Tarangus uses a ring between the forward and rear fuselage to stretch the plane.
A lot of parts combine to make the fuselage — nose and cockpit, fuselage extension ring with intakes and engine fan attached, and the rear fuselage with the engine sandwiched inside — but it fits pretty well.
The dorsal ridge, molded with the cockpit section, and the one-piece lower wing form a sturdy structure. I had to sand the area around the extension ring for a perfect fit. Then I filled the forward of the two lines because only the rear one is visible on the full-size plane.
The wings, canards, and tail needed just a touch of filler. None of the control surfaces are separate — not a critical omission, although it would have been nice to pose the canard flaps down as often seen on grounded Viggens. The trailing edge of the vertical stabilizer is over-scale.
The instructions indicated the model would stand on all three legs without extra weight. I added a small fishing weight to the nose cone just to be sure.
Several scoops are added to the fuselage in steps 30-34. They fit the cutouts fine, but the bottoms need sanding to sit flush with the surface.
After I installed the extra flap-actuator fairings, ventral fin, cannon pod, and fuselage pylons, the Viggen was ready for paint.
I wanted to apply the wicked four-color splinter camouflage, but deadline pressure forced me to paint my JA 37 in the later two-tone gray. I used Tamiya acrylics, weathering along the way with mottled lighter and darker shades. The engine section and wheel wells were painted with Testors Metalizer lacquers.
The decals have minimal carrier film and laid down beautifully over a coat of Tamiya clear gloss acrylic. Be careful, though: The adhesive liquefies quickly. A couple of stencils floated off the backing paper and onto the blotting paper while I was tending to the model — and they stick to the first place you put them. A bit of water on the surface can help; a dab of saliva works even better. Micro Sol settled the markings into most details.
The biggest problem with adding the decals was that the panel lines on the large marking diagrams don’t always match the lines on the model. There are a lot of stencils on the weapon pylons, and orienting them correctly is challenging. Photos are a big help.
The spindly main gear has a lot of parts, and it’s easy to misalign something. I used slower-setting cement for extra working time. The join between the upright and the crosspiece that the wheels attach to is a weak spot. I flowed in super glue and left it overnight to be sure the wheels didn’t collapse or toe in under the weight.
The only stores are a centerline fuel tank. It would have been nice to add missiles or pods to the other pylons.
The finished model looks like a Viggen. A couple of things mar what could be an excellent kit. They include the aforementioned thick trailing edges, which can be thinned with sanding. The probe on the leading edge of the tail is way over-scale but easily replaced with wire. The fuselage pylons have vertical, straight front and rear edges, whereas they should slope as shown in the marking illustrations. Again, they wouldn’t be hard to trim and sand.
The instructions show two lights on each wingtip, but photos of JA 37s show only the small rear lights in place. I painted over the forward ones after installing them, but I wish I had discovered it earlier and blended the parts properly. No mention is made of attaching the upper position strobe, but is included on the clear sprue.
None of the problems listed are deal-breakers — they all have easy fixes — and the finished model looks terrific. It doesn’t fall together, but rewards careful construction and basic modeling skills. I enjoyed the 25 hours I spent building my Viggen, and I can’t wait to see what’s next from Tarangus.
Note: A version of this review appeared in the April 2015 FineScale Modeler.


