
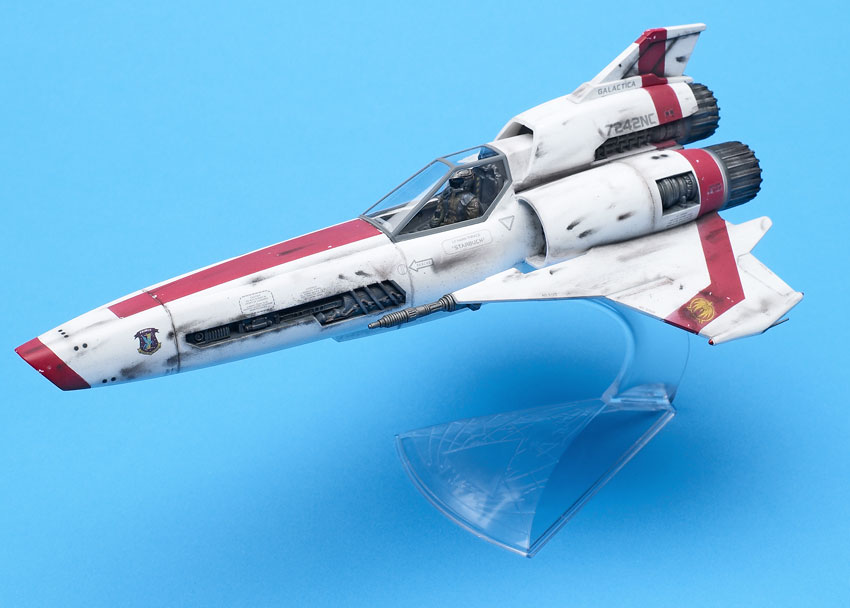
The original “Battlestar Galactica” was pretty cheesy, but the Colonial Viper was a great-looking fighter. When the reimagined BSG premiered on the SyFy channel in 2003, I was intrigued to see what the new Viper would be like. I wasn’t disappointed. The Viper Mk.II hits all the right design cues – three engines, triangular wing arrangement, long nose – but it’s been updated with wing sweep and more curves. (And they added maneuvering thrusters to give it more realistic physics!)
So, I was thrilled when Moebius announced plans to kit the Viper – and I was not disappointed.
Molded in white plastic the parts show crisp detail. One highlight is a good cockpit with separate controls and instrument decals. The DRADIS screen is molded in clear plastic so modelers with a penchant for lighting have more options.
To crew the fighter, Moebius throws in a nicely sculpted resin pilot with a separate arm including the upper half of the joystick. The decals include patches for the figure.
The kit includes landing gear and a stand – a copy of the Aurora classic that has become a Moebius trademark – for display options.
The instructions, made to look like a Colonial Fleet memo, feature written assembly sequences bolstered by photos and diagrams. Unfortunately, some of the photos, especially the color references, are small with almost unreadable text. An enlarging photocopier, magnifying glass, or Optivisor is essential.
Nicely printed decals include the red stripes, thrusters, and stencils to mark the Viper for either Apollo or Starbuck. Optional decals are provided for those who prefer painting the stripes.
The instructions start with a warning to follow the instructions carefully. Be sure to read the text; it details exactly when to apply glue to particular joins during assembly of the rear fuselage/engine section.
To pose the ship in flight with gear up, I started by gluing in the gear-bay covers. The interior slides firmly together in slots, then fits nicely into the forward fuselage. I ran a little super glue into gaps at the rear for a tight fit.
The wings assemble well but need filler along the leading and trailing edges.
I painted the engine fans metallic gray, the upper intake black, and the upper engine detail (parts 18 and 19) before adding the engine section; these areas were impossible to reach after the model was assembled. I left the exhausts (Part 7) off for painting.
After masking the engines and cockpit, I primed with Tamiya white fine surface primer, followed by Tamiya spray-can flat white. Then I masked for the red stripes, added salt to chip the paint, and airbrushed Model Master insignia red enamel. A mix of gunmetal and gunship gray color the exposed mechanisms on the airframe.
The decals are very thin, so handle them carefully. They apply well over gloss, but the separate yellow insignia are not backed with white and disappeared on the red. I ended up trimming the markings from the red stripe decals. Afterwards, a coat of Model Master Acryl clear flat dulled the finish and set the stage for weathering with artist’s oils and Mig Productions pigments.
This is a great kit of a terrific subject. A little modeling skill is essential, but anyone with a few kits built should be able to produce a good-looking Viper.


