
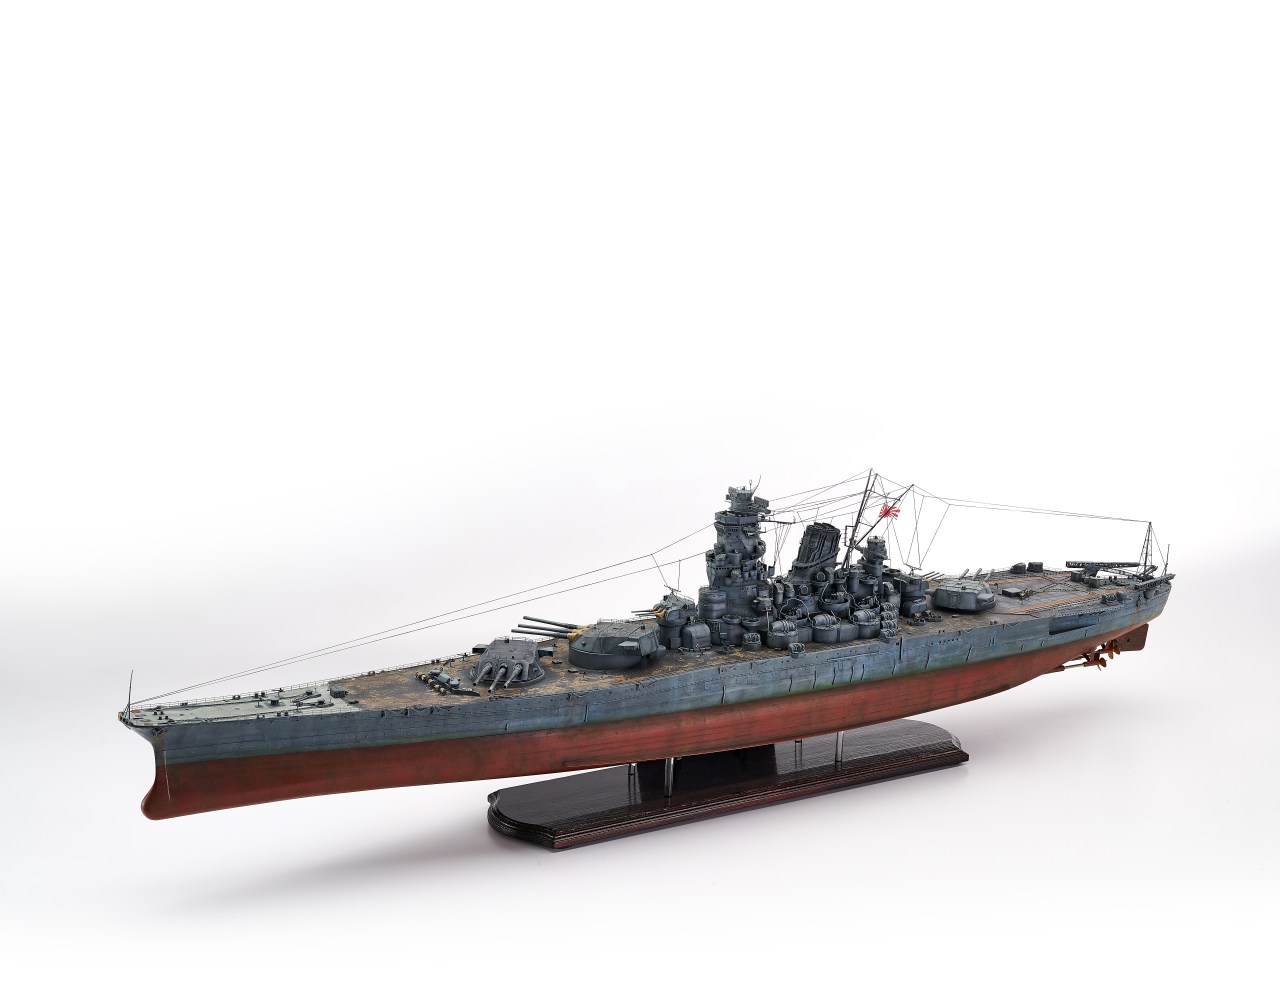
Painting and camouflage
The main color of the ship was an overall dark gray with a red-brown hull. Much of the main deck was wood, and there were two strips of linoleum on the floatplane deck.
Scale Colors, a new brand of acrylic paints, have colors matched for Japanese ships. I thinned them with Scale Colors thinner at 7 parts paint to 3 parts thinner. Here is a list of all the colors I used and the sequence in which they were applied:
- Lower Hull: Scale Colors IJN Anti-fouling Hull Red (No. SC111).
- Wood Deck in the Upper Tower Bridge: Vallejo Panzer Aces Old Wood (No. 70.310).
- Main Deck: Before adding the black “camo” paint, I airbrushed Tamiya Deck Tan (No. XF-55), Red Brown (No. XF-64) and Desert Yellow (No. XF-59) in random patterns. A mist coat of Scale Colors Deck Teak (No. SC900) blended the shades in preparation for weathering.
- Upper Hull/Superstructures: A base coat of Tamiya IJN Grey (Kure Arsenal) (No. XF-75) with highlights of Royal Light Grey (No. XF-80), and a final mist coat of Scale Colors IJN Kure Naval Arsenal Gray (No. SC107) overall.
- Forward Anchor Deck: This part of the deck was unpainted in real life and noticeably lighter than the rest of the ship’s gray. I airbrushed Tamiya Sky Grey (No. XF-19) to simulate zinc steel.
- Linoleum: Scale Colors IJN Linoleum Red-Brown (No. SC110) with dry-brushed brass-colored frames.
- Canvas Blast Bags: Vallejo Panzer Aces Highlight US Tanker (No. 70.322).
- Floatplane: Tamiya J.N. Green (No. XF-11) topsides and Royal Light Grey underneath.
- Navigation lights: Vallejo Game Color Bloody Red (No. 72.010), AK Interactive 3rd Generation Lizard Green (No. 11145), and Tamiya Flat Aluminum (XF-16).
- Chrysanthemum at bow and Propeller Screws: Citadel Gold (No. 21121).
Backdates
As it comes in the box, the kit replicates the Yamato at the time of its demise in April 1945. To backdate her to October 1944, I made these alterations:
- Omitted the middle three midship Type 96 triple AA 25mm mounts (Step 33: middle three Q2 parts). Omitted two deck gun positions (parts W11).
- Omitted several deck gun positions and all sandbag emplacements (parts M5,M7, Q1, M8/9, M19/20).
- Omitted the stern elevated twin gun tubs (parts M1, PE G22).
- Omitted the turret-top gun positions (parts W9, W13).
- Photos show that Yamato was missing the main gun sighting apparatus when in action in 1944. This includes the sighting device atop turrets (part L20). I also left off the PE trusses on the gun barrels (part PE H2 and H3) as these were only temporarily fitted when adjusting the guns and were not on Yamato in October 1944.
- The kit includes F1M2 “Pete” and E13A “Jake” floatplanes, but in 1944 only Petes were aboard. I used tail code 212-01 from the decal sheet to represent the aircraft that was spotting for Yamato when she sunk USS Gambier Bay. The decals went on well with Tamiya decal setting solution. I cut the wings so I could pose them folded and located the float plane in the plane’s lower deck hangar well, 21.
- I added 25 single 25mm AA guns on the deck, sourcing extras my old Nichimo kit as the Gallery kit does not have enough. I made tiny base plates for each by cutting squares of .010-inch styrene sheet, 22.
- I altered the placement of some of the deck ammo containers to correspond with the added single 25mm guns.
- The mainmast Imperial Japanese Naval flag is supplied as a decal. Folding it over itself isn’t a great plan as it will be fragile and deteriorate, so instead I cut .010-inch styrene sheet to the size of the flag. After gently bending it over low heat, I applied the decal, 23. I didn’t add any of the other flags because they weren’t in use at Leyte Gulf.
The kit also did not include decals for draft markings, so I used Peddinghaus 1/200 sale Draft Marks for Ships (No. EP2883).
Final Thoughts
Having finally experienced this monster, it has now given me a whole new appreciation of large-scale ships. If you are a Yamato or Musashi fanatic, or interested in large ships and love PE, then this model is for you. It will take some thinking and test your skills, but it’s a satisfying journey all the same. Just make sure you have the real-estate to display it!
Weathering
Yamato was well cared for during its service, not seeing action until 1944. By then, it had been ferrying supplies and would have begun to see significant weathering, particularly below the water-line; some photos suggest this weathering was severe. Weathering was achieved as follows:
- To modulate the monochromatic color below the waterline, I sprayed bright complimentary colors — AK Real Color RLM 61 (No. AK268) and Tamiya Sky (No. XF-21), Flat Yellow (No. XF-3), Orange (No. X-6), Hull Red (No. XF-9), Flat White (No. XF-2), and Flat Black (No. XF-1) — through a splatter mask. A light overspray of the original hull color blended it all together before I flowed on a wash of raw umber artist oils.
- I applied dots of various artist oil colors, including Winsor & Newton Burnt Sienna (No. 074) and Titanium White (No. 644) and 502 Abteilung Field Grey (No. ABT150), Oxide Patina (No. ABT260), and Faded Green (No. ABT040), and blended them into the hull with a flat brush, 24.
- I also used dot filters to weather the main deck. The colors applied were: Winsor & Newton Burnt Sienna, Yellow Ochre Pale (No. 746), and Burnt Umber (No. 076), and Abteilung 502 Buff (No. ABT035). An overall wash of Winsor & Newton Raw Umber (No. 554) added definition to the molded planks, 25.
- Photos of Yamato in October 1944 show an unusual black camouflage intended to conceal it as it maneuvered at night. The crew took soot from the funnel, mixed it with dark gray paint, and applied it to the deck and forward turret. The result was a patchwork of black and gray clearly visible in photos.
- I replicated it by airbrushing mixes of several Tamiya black and dark gray acrylics over hairspray and chipping it away with a water-damp brush. I sprayed patterns over this using Ammo by Mig Jimenez Shaders Ash Black (No. A.MIG-0858) and Starship Filth (No. A.MIG-0855), 26.
- Deck night warning markings were masked and painted AK Real Color Off White (No. RC013), 27.
- I added the oil and grease spills on the floatplane deck using 502 Abteilung Engine Grease (No. ABT160), AK Engine Grime (No. AK082), and Wilder Nitro Line Grease (No. NL35), 28.
- I mixed 1 part Winsor & Newton Lamp Black (No. 337) with 3 parts 502 Abteilung Ghost Grey (No. ABT25) as an overall wash for the gray areas. Then I used dot-filters weather the hull sides, 29.
- To build up grunge and undersea growth along the waterline, I airbrushed light coats of Dirty Down Moss and Verdigris acrylics followed by streaks of Ammo starship filth. I used a stiff brush to flick on tiny splatters using AK Interactive Decay Deposits (No. AK 675).
- To highlight details on the gray areas, I used Ammo Drybrush Paint Medium Grey (No. A.MIG-0602) before a coat of AK Interactive 3rd Gen Satin Varnish eliminated remaining glue marks and provided a consistent protective finish.
Noticeable accuracy issues
Because both ships were built in secrecy, few detailed photos of Yamato or Musashi exist.
While a plethora of books and references are available, the most accurate sources are period photos and underwater photos of the wrecks. No complete factory blueprints on these ships exist. Many line drawings may be interpretations, although those of some of the weapons and equipment that were used on Yamato and other ships is more reliable. Again, because color photos of the ship are so rare, exact colors are best guesses or derived from crew testimonials, which can be inaccurate.
With that said, one must decide on what time-period to depict the model. I chose Yamato during its engagement with Taffy 3 in October 1944. This date is crucial in modifying the kit’s armament complement and arrangement.
For these modifications, I used the “scale rule” that says if you cannot see the detail standing 200 feet away in real life, then I do not bother adding it to the model. I found some of the kit’s PE parts too small (even for 1/200), or too fragile, so I omitted them to move the project along without sacrificing detail. The corrections I did make were as follows:
- The most noticeable issue is the heavily exaggerated sheer strakes (hull plating), which had to be sanded down significantly starting with large, 150-grit sanding pads and then finer grades, 12.
- The kit’s 18-inch plastic gun barrels featured difficult-to-remove mold seams and attachments, so I replaced them with an out-of-production set of turned-metal barrels from JB Model designed for the old Nichimo 1/200 scale Yamato that I had in my stash, 13. It was work retrofitting these into the turrets, but there are newer metal barrels available for the Gallery kit.
- I recommend replacing the kit rudder with a more accurate 3D-printed item from Model Monkey. I did not because it was not available when I built the hull.
- Paint small deck parts and fittings separately to avoid complex masking around these items later. I attached them to cardboard with double-sided tape, 14.
- The kit includes metal propeller shafts, but the inner ones are 1cm (.4-inch) too long. You need to trim the shafts or deepen the locator holes for the shafts. I went with the former, because I realized they were protruding too far after I assembled the mounts in Step 12.
- I modified the rear Type 94 HA Fire Control Range Finder by replacing the box-like arms (parts W17 and W18) with scratchbuilt arms using 3/32-inch styrene rod as a base, 15. These arms were different from the forward ones shown in the Model Art Super Illustrated reference.
- Using a 9/64-inch drill bit in a pin vise, I opened the bow pipe; it is molded solid on the model, 16.
- I also drilled through the hawsepipes on the forecastle and hull so the bow anchors would sit properly. When attaching the shanks (Part J9), place them at an angle of about 20 degrees off vertical from the crown (Part J38), 17. Attach the chain after gluing the anchors in place.
- A detail that I added were four small hand-wheels on the anchor deck. I mounted unused PE searchlight wheels (Part PE-C38) on fine brass wire and superglued them in place around the anchor-chain runs, 18.
- The forecastle is also missing the leadsman platforms, so I added them with spare PE and styrene, 19.
- The kit omitted lifebuoys. I made four from thin slices of 1/8-inch styrene tube painted with red and white stripes.
- Some of the gun tub support brackets do not fit, so I inserted thin styrene spacers for a seamless join.
- While the kit provides all the PE you will need, the 15.5cm rangefinder on the main tower with its Type 21 radar mattress array looked off compared to several references (which also seemed at odds with one another). Either way, the inner PE details (parts PE D45) were too fragile and their placement unclear. So, I fashioned my own PE mesh from spares for a more acceptable appearance.
- After dragging fine, beige thread through beeswax, I wound it around the deck reels to simulate fire hoses.
- I rigged the ship with EZ Line Heavy — black for standing and tan for running — attaching it with superglue. For the running rigging on the superstructure, I cut small pieces of 3/32-inch styrene tube to help anchor each rope, 20.
Taking a stand
The kit provides a nameplate but no stand. I drilled four ¼-inch holes in the hull to accept clear acrylic rods mounted in a simple wooden base. Matching holes were drilled into a basswood block glued into the hull. I left the model loose for assembly and painting. The final touch was a new color label designed in PowerPoint, printed on high-gloss paper, and glued to the kit’s plastic nameplate, 1.
Occasionally, a kit comes along that takes the modeling community by storm and this is one of them. Only one word can describe Gallery Models’ Yamato — massive!
This kit arguably holds the record as the largest injection-molded plastic kit ever produced at almost 5 feet long. The box contains more than 2,800 parts and 15 photo-etched metal (PE) frets and weighs 21 pounds. It marks the first 1/200 scale kit of this World War II behemoth since Nichimo released one way back in 1968!
This is not a review of what’s in the box — you can find that in a special FSM New Product Rundown video. Also, I am not aiming to create a 100% historically accurate replica. Rather, I want to provide tips to making a convincing representation of Yamato while fixing some notable accuracy issues. I intentionally used minimal aftermarket products to allow the model to stand on its own.
A brief history
The lead ship of its class built for the Imperial Japanese Navy (IJN), Yamato was launched on August 8, 1940, and commissioned one week after the Pearl Harbor attack. Yamato and its sister ship, Musashi, were — and still are — the largest battleships ever built. The hulls were 863 feet long and, fully loaded, each ship displaced nearly 71,000 tons. Their main 18-inch guns fired rounds that weighed as much as a small car at a range of 25 miles.
After the Japanese defeat at Midway in June 1942, Yamato spent its time transporting supplies between remote bases. The ship finally saw action at the Battle of Leyte Gulf. Ironically, while designed to sink enemy battleships, Yamato fought Allied ships only once in action against the U.S. ships of Taffy 3 at Leyte, where it sank the carrier USS Gambier Bay, the only American carrier to be sunk by a surface warship in WWII. In the end, Yamato was sunk on April 7, 1945, and of the 3,332 crew members aboard, only 276 survived.
Building the hull
The hull comes partially assembled with several hefty metal U-shaped metal braces supporting it, 6. While you are required to re-tighten the screws, do not tighten them too much or you risk warping the hull resulting in an ill-fitting deck!
With the brackets in place, I ran liquid cement along the center seam, 7. To ensure the long seam stayed together, I reinforced sections with 5-minute epoxy and thick styrene sheet.
Clamps kept the bow and stern together and aligned as the glues set, 8.
Before adding the main deck, I glued styrene blocks atop the large ejector-pin marks inside the hull to help support the part, 9.
Although the kit features mostly good fits, the starboard side needed encouragement in the form of a large bar clamp to meet the forecastle deck, 10.
I left off small parts and fittings from the main deck so I could paint it without complicated masking.
In preparation for painting, I sprayed the hull with Tamiya Fine Surface Primer Red Oxide (No. 87160) directly from the can, 11.
Construction tips
I found no obvious inaccuracies that the non-Yamato enthusiast would notice, so building this kit completely out-of-the-box will yield a good representation of Yamato as it appeared in 1945 when sunk. The parts are beautifully detailed with little flash thanks to slide molding. Surface detail is crisp and sharp with no need to open scuttles or portholes. However, sink marks abound; fortunately most are hidden or on the undersides of platforms, so I did not bother filling many of them. The kit’s design indicates other variants of the class are planned. The excellent instructions provide accurate color references and clear parts placement. The only problem is the lack of rigging diagrams. There is also no indication of where to place the ship’s lifeboats and cutters. These boats were stored internally at the rear of the ship inside boat hangers, so I left them off. I generally followed the instruction’s sequence, but given the size of this kit, I recommend the following:
- Separate each PE fret with the cardboard backing in between to make it easier to access these parts without damaging them.
- Use drill bits to help “shape” PE parts for a better fit over compound curves, 2.
- Build and paint the model in subassemblies, including PE and rigging. This approach makes it easier to assemble and weather the model given its size. For example, I did not attach the super-structures, turrets, rear floatplane deck, and secondary 15.5cm gun turrets to the main deck until after I painted and weathered the deck and hull, 3.
- Install and paint the floatplane hangar area, including PE before installing the upper floatplane deck, 4.
- For long PE details, such as railings and the tracks for the floatplanes, I anchor one end with superglue and secure the spot with accelerator. Then I work my way along that part until it is installed. This ensures a strong, yet straight, aligned joint, 5.
- Add PE and delicate plastic parts to the inner areas of each subassembly first, then work out from there. This helps prevent damage to fragile details.
- Paint small parts, such as davits, on the sprue. This includes spraying the PE railings while they are still on the frets.
- I replaced some small, fragile PE parts with styrene as I found the tiny gluing surfaces made obtaining a strong joint difficult.
- Add the paravane rollers (parts B36 and B37) after the railings are in place to ensure they are correctly located.
- This kit has many tiny parts that will be swallowed by the Carpet Monster! Although it sounds basic, I laid a large single-color bedsheet on the floor to catch dropped parts.
- Install the main deck side railings last to avoid damaging them.


