
Kit: No. SW-3
Scale: 1/72
Manufacturer: Fine Molds, available from International Hobby Supply, P.O. Box 426, Woodland Hills, CA 91365, 818-886-0423, www.internationalhobby.com
Price: $47.50
Comments: Injection-molded, 82 parts (including display stand), decals
Pros: Beautiful detail, accurate shapes, great decals and instructions
Cons: Decals may be too complex for beginners

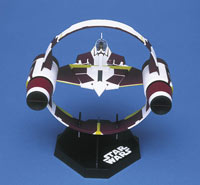
Fine Molds’ Jedi Starfighter is the third model in its line of 1/72 scale “Star Wars” kits. After decades of poorly detailed, toy-like models, “Star Wars” fans have a series of fine constant-scale kits to build.
The kit includes several sprues of sharply molded (and individually bagged) white and clear parts; it’s much like what you’d expect from Hasegawa or Tamiya. The tiny Jedi Starfighter and its circular hyperdrive ring can be combined into one model, as I chose to do, or displayed on individual stands. An optional landing gear is provided for the fighter, and a good-looking seated Obi-Wan Kenobi figure is included for the cockpit.
The instructions contain only Jap-anese text, but the illustrations are clear enough. A painting chart includes Gunze Sangyo and Tamiya paint codes; I used the paint chart in my Tamiya catalog to decipher them.
My kit went together easily. The cockpit includes console and instrument-panel decals, as well as a separate control stick and clear gunsight. I covered two prominent sink marks just outside the cockpit with triangles cut from .010″ styrene sheet. To pose the model on its display stand, I left off the delicate landing gear and glued the gear doors shut.
The hyperdrive ring went together just as easily as the fighter. Once assembly was complete, I masked the canopy and airbrushed everything Tamiya flat white (XF-2). After a few days’ drying, I airbrushed Future floor polish to prepare the model for decals.
Two full 7″ x 8″ decal sheets are included to reproduce the fighter’s complex maroon-and-green markings. Paint the model white, and the decal sheets will provide almost all the rest of the scheme. Sound easy? There’s one catch – there are more than 200 decals to apply!
The decals are nicely printed and go on easily enough, but many of them will require careful trimming with a sharp hobby-knife blade while they’re wet and on the model. I used a lot of Micro Sol to get the decals to conform.
Despite my best efforts, the decals still didn’t cover a few areas well. Fortunately, Testor Model Master British Crimson (No. 2009) is almost a match, so touching things up with a fine paintbrush was easy.
Aside from the instructions, I used a DVD copy of Episode II as a reference.
I enjoyed building my Jedi Starfighter, although I spent more time applying the decals than I did building or painting it. You’ll want to have plenty of experience with decaling before adding this diminutive, beautifully detailed fighter to your “Star Wars” collection.
Matthew Usher