
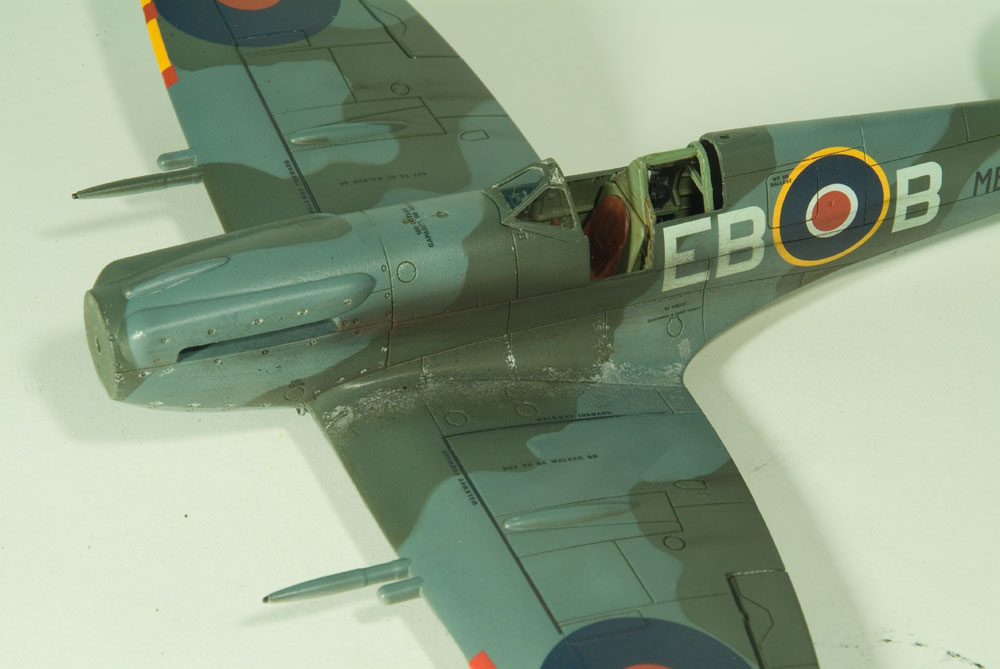
The pilot entered the cockpit over the port wing, so most Spitfires show paint wear at the root beneath the door. To chip and weather the paint, I tore off a small chunk of foam rubber. (The dark foam that some electronics come packed in is ideal; you want foam of medium density – not too open or too dense. I held the foam with tweezers and lightly dipped it in a shallow puddle of Testors Model Master aluminum enamel. I blotted the foam against a piece of scrap paper to remove excess.

I noticed some marks around the cowl fastener. I’m not sure if they are scratches or chips, or if it’s an alignment mark on the aircraft to help the mechanics align the fasteners. I’m leaning toward the latter, because they all seem to be oriented the same way. Using a 10/O brush, I applied tiny dots of Testors Model Master camouflage gray around the molded fasteners. If any ended up too big, I painted over them with the base color and reapplied the marks.

I gently touched the foam to the walkway on the wing. Each touch deposits little dots of paint. Don’t press hard though, or you’ll leave too much paint. Change the angle of the foam and the pressure of the application to vary the effect. I applied more underneath the hatch, tapering it toward the leading edge. Look at photos as you do this to get it just right. I concentrated a little more along panel lines, as I saw in photos, as well as adding light wear on the starboard wing. I also chipped the paint in prominent areas, such as the engine head bulges.

For exhaust on the fuselage, I started with a light application of black pastel behind and below the exhaust and curving down the side as the effect diminished. I followed with a light application of burnt umber in the center of the exhaust plume.
After that, I added the last parts and called the model done.

Pastels came next. I ground a little black onto a sheet of sandpaper. Using a fine brush, I picked up a little of the powder and brushed it onto the airplane, starting at the shell-ejection ports under the wings and brushing toward the rear of the wing so the effect tapers off toward the rear. The nice thing about pastels is that you can gradually build up the effect by applying a little more pastel. Dark brown pastels behind the gear wells replicated mud and dirt streaks.

While the surface was still glossy, I applied a wash of dark brown artist’s oils to the panel lines. I prefer a targeted pinwash to an overall wash to prevent the surface from becoming too dark.

One of the aircraft featured in the decals of Airfix’s 1/48 scale Spitfire Mk.XII kit is MB882 (fuselage code EBB). One of the great things about this aircraft is that there are several wartime photos of it, so it’s easy to gauge the wear and tear it suffered. The images show a used but well-maintained airframe. There’s worn paint at the wing root, some exhaust staining, and a couple of other chips and scratches. Here’s what I did after applying Pledge Future floor polish, followed by decals and a sealing coat of Future.
I spent a lot of time getting the decals to settle into the panel lines and other detail, starting with a couple of applications of Micro Sol. Then I ran the tip of a fresh No.11 blade along the panel lines where the decals were. Another coat of Micro Sol ensured the decals laid down on the surface. This process is time-consuming, but I wanted the panel lines to cross the marking, not the marking across the panel lines.
I removed excess wash by wiping the surface with a cotton swab damp with clear thinner. Wiping in the direction of airflow creates subtle streaking that looks like dirt or fluid spills being swept back.

Once everything was dry, I airbrushed the model with a coat of Model Master Acryl clear flat.

I applied more streaking around the belly of the Spitfire. Photos of the airplanes show heavy oil and fluid in these areas.
