Kit: No. 02306
Scale: 1/35
Manufacturer: Trumpeter, www.trumpeter-china.com, available from Stevens International, 856-435-1555
Price: $44.95
Comments: Injection-molded, 205 parts (9 photoetched metal, 2 metal, 4 vinyl, 1 string), decals
Pros: Good fit; flawless moldings; position options
Cons: Elevation limited by length of hydraulic dust covers
Issue Published: October 2009

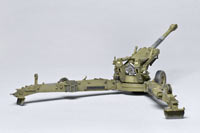
Trumpeter’s first M198 kit represents the early version of the 155mm howitzer, but unused parts – including hydraulic gauges – indicate later versions are planned.
Molded in Trumpeter’s typical light gray plastic, the parts are among the best I’ve seen. The long trails are single, heavy pieces with separate bottoms, but there are no sink holes or ejection-pin marks. The muzzle brake is a gem of slide molding that captures the complex internal and external shapes almost perfectly and needs just a few swipes of a sanding stick to clean up. Ammunition and loading tools are included on the sprues despite no mention of them in the instructions.
Trumpeter provides vinyl tires, two large ones for the main wheels and two smaller tires for the transport wheels. They have an accurate tread pattern and the right manufacturer logos.
A small fret has photoetched-metal details as well as the distinctive mesh cover over the gun’s rear. Trumpeter supplies two preshaped metal covers for the elevation cylinders; they fit perfectly and look terrific.
A small decal sheet provides warning placards and labels but no unit markings. Painting instructions show two options – one all green, one in the temperate MERDC scheme. The absence of specific unit markings means any scheme you can find should work. The painting instructions don’t mention that the breech and the section of the barrel from the frame to where it narrows should be steel.
I glued the barrel together, then built the recoil system. I couldn’t find a positive location for the barrel – and alignment is critical because both the breech and the muzzle brake are keyed. I left the barrel loose until the muzzle brake was attached to be sure it was right. Note: You must have the barrel threaded through the recoil carriage before attaching the brake; it won’t fit through the holes afterward.
The elevation system is designed to be movable, but the attachment pins are tiny and easily broken. Optional dust covers provide different elevations. The instructions aren’t clear, but the shorter parts (C9) are for the combat position, while the longer parts (C5) are for the travel mode. My biggest complaint is the maximum elevation allowed by parts C9 is about 30 degrees. A lot of photos show much higher elevations. It would be easy to trim these parts before installation to achieve a more dramatic display. Construction of the elevation arms in steps 4 and 5 is fiddly, but the whole assembly is quite sturdy.
I attached the barrel and recoil assembly to the base (parts A28 and A34) but left the sled base, support frame, and mesh cover off to ease painting.
The trails went together well; a little putty eliminated seams where the undersides (parts C43) fit.
I chose the combat position, gluing trails open and locked, wheels up, base plate under the weapon, and spades in place at the end of the trails.
I painted the gun and carriage separately, then attached the tires. The decals sat down perfectly over a gloss coat with a little Micro Sol.
The finished model looks like an M198, with lots of nice detail, including disc brakes and gunsights. It would look great in firing position within a diorama, or being towed behind Italeri’s 5-ton truck.
Modern artillery fans who have a little experience with complex assemblies and photoetched metal will certainly get a bang out of this American medium howitzer.
Read more model kit reviews.
Browse our line of downloadable articles.


