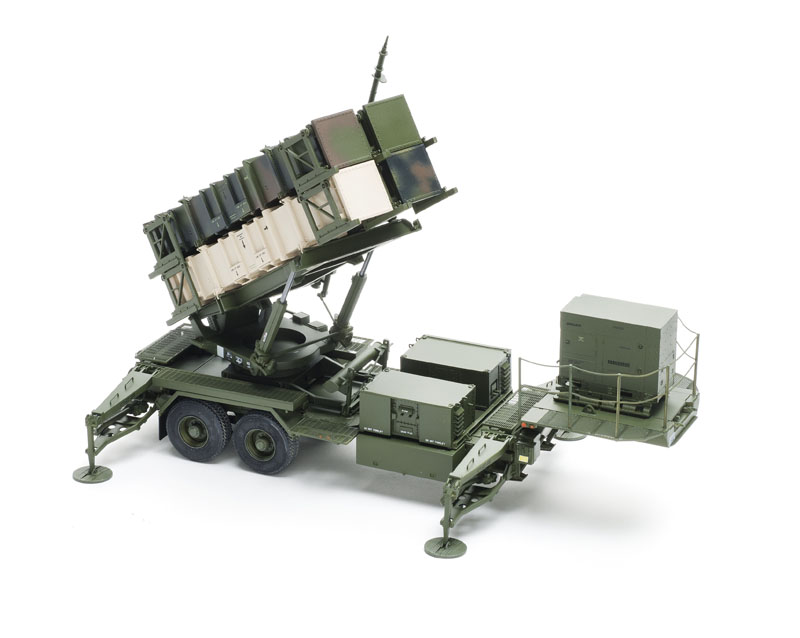
Trumpeter surprised the modeling world with its release of the Patriot SAM System, which includes the M901 launching station and the AN/MPQ-53 radar set.
It’s a large box with 38 sprues and several individual gray plastic parts, clear plastic lights, three photo-etched (PE) frets, and eight vinyl tires.
The plastic is brittle; I broke several of the smaller parts removing them from the sprues. The crisp moldings are marred by a little flash and mold seams. Only a few ejector-pin marks under the fenders need to be eliminated. The rest will be invisible.
Keeping track of the differences between the two trailers can be complicated, especially if you build the pair at the same time. I’ll build them separately next time.
One marking choice is included for each trailer, with color five-view drawings of the NATO three-color camouflage on each trailer. Study the instructions to plan for painting; there are a lot of tight spots.
Starting with the outriggers, there are small pour plugs on parts G1 that look like they belong — but, actually, they should be removed. Subassembly N-1 was not glued in place until painting was complete. This allows for easier painting of the interior of the outriggers. The directions have you glue the upper and lower halves of the outriggers to their brackets (parts E25, E43, E11, E37, E41, and E13), then mount this subassembly to the trailer frames. But I found it easier to attach the brackets to the trailers first and then add the upper and lower outrigger arms. Remember to place Part E19 between the two outrigger brackets; it can’t be added later.
To fit the walkway frame (Part R21), I cut a groove in Part R9 so the cross member in R21 sits flat. When assembling the beds, you need to drill holes in parts F3 specific to each trailer.
In Step 6, you mount the front walkway platforms. But I would I suggest waiting until the trailers are finished to avoid damaging them.
In Step 7, Part E20 has two small tabs that look like imperfections. But they’re actually locators.
Starting in Step 10, you are adding parts only to the launcher trailer. A problem arises in Step 11: The bracket on S1 for the working doors is molded in the wrong place and needs to be moved. I ended up gluing the doors closed because the small pin that allowed them to remain workable broke during handling.
The launcher unit is designed to elevate, but the antenna locks it in place. One missile is included.
After building the launcher trailer, the radar unit was a breeze. The ladder posed the only challenge — PE rings glued between plastic rails. It’s a fiddly build but looks great finished. The ladder is made of PE steps sandwiched between the two rails of the ladder. Unfortunately, the toolbox interferes with the ladder and prevents it from touching the ground.
In Step 22, the directions call for you to snap Part V5 in place on the radar box. But I glued it to the trailer instead and attached the box after painting. I replaced the fiddly PE rivets on the dish with .010″ styrene discs.
I painted the radar in the indicated NATO camo but deviated from the instructions on the launcher, painting it overall NATO green with a variety of colors on the missile boxes as seen in many operational photos.
The decals looked good but are a little thick. Be warned, there are only enough markings for one side of the missile boxes; apply them on the outer surfaces once they are mounted on the trailer.
This model is not for the inexperienced, as the many small, fragile parts can be frustrating. But if you are up to it, your perseverance will be rewarded. I took 74 hours to finish both trailers.
Note: A version of this review appeared in the July 2016 issue.


