Star Wars model kits come in a variety of scales, just like model aircraft, including 1/72, 1/48, and 1/144. Kits of the large capital ships run to scales like 1/5000 or even 1/14500. At the other end of the spectrum, Bandai produces 1/12 scale model figures of Star Wars characters. Pick what interests you, but we’ll concentrate on vehicles for this story and choose the Bandai 1/72 scale B-wing for our subject.

Building any Star Wars model kit, whether it’s snap-fit or a complex kit that requires glue, you will need a hobby knife with a No. 11 blade and a pair of side cutters (also known as nippers). Other tools you may want to invest in include:
• a pack of sanding sticks of various grits
• liquid cement (helpful even on snap-fit kits)
• replacement No. 11 blades
• fine-tipped tweezers
• a couple of good-quality paintbrushes

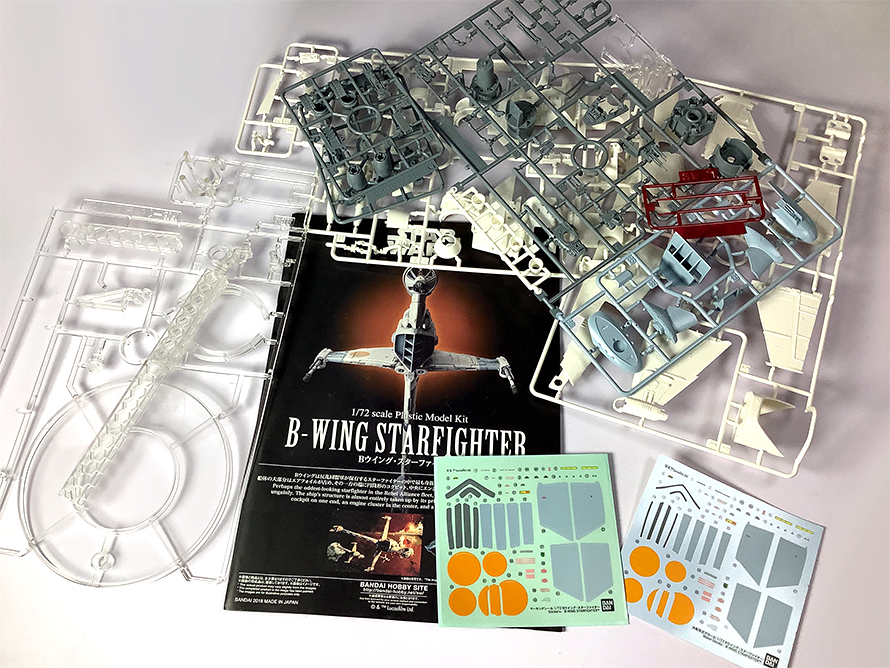
Bandai Star Wars model kits like the B-wing come with an instruction manual, stickers, waterslide decals, and even a stand. The frames that hold the kit parts are variously called parts trees, sprues, or runners. The parts come molded in color so a beginner can build it without needing to paint it—but it will look better finished.

Star Wars model kits come with detailed instructions. Bandai prints some of the most concise and easy-to-follow instructions in the hobby. No matter the model or maker, make sure to read the instructions carefully to ensure you do not miss a step or orient a part incorrectly. To be safe, only cut off the parts from the runners you need for the assembly of the section you’re working on.

When removing parts from runners in Star Wars model kits, cut through the sprue gate (the tiny area that attaches the part to the runner) a few millimeters away from the part. This avoids creating stress marks in the plastic part or accidentally gouging the part.

With the Star Wars model kit part free from the tree, trim the sprue gate down a little at a time to avoid creating stress marks. When there’s just a little bit of sprue left, you’ll move to your hobby knife.

Find a comfortable way of holding your hobby knife and slowly shave away the last of the sprue until it is gone. Remember, your knife blade is sharp, so take it slow and be careful not to cut yourself, shaving off a little bit at as time. Be patient. Building model kits is not a race.

With the parts cleaned up, it’s time to assemble. Some model kits have similar parts, so be sure to read the instructions carefully to avoid going back and disassembling something because you’ve forgotten a part. Follow the instructions until you’ve completed building!

If you’re happy with your Star Wars model kit as is, great! But, if you want to go further, you can paint. First, you’ll want to disassemble your model and group them by color; you don’t have to strip it down to each individual part, but manageable subassemblies works.

Soak the model kit parts in warm water with some liquid dish soap. This will remove any dirt and oil from your hands, allowing the primer to adhere better. Let the parts dry thoroughly.

Alligator clips with handles and a cat scratchboard or foam slab are useful for holding model parts for painting but are not absolutely necessary. Be careful where you set down freshly painted parts so you don’t mar your paint job.

Spray paint can be an easy entry into painting Star Wars model kits, especially for beginners. But an airbrush allows you to do finer detail work. I’m using a Harder & Steenbeck Infinity CR Plus with a .2mm nozzle at 30 psi.

Prime your parts. Usually offered in white, gray, or black, primer is formulated to stick to an unpainted surface. I’m using Vallejo Mecha Primer Black (No. 73.642) thinned 1:1 with Vallejo Airbrush Thinner (No. 71.161). First, spray a light mist coat to give the surface some tooth, and then follow with a solid coat.

Next, airbrush your base colors. The instructions provide a color guide for specific paints for your Star Wars model kit. Or you can look for a close match. I had Vallejo Mecha Color paint on hand and used them, thinning them 1:3 thinner to paint.
It’s a fictional vehicle, so don’t get too hung up on exact colors. Give yourself room to be creative.

Just like with the primer, I first airbrush a light, mist coat to avoid paint pooling and drips before spraying on a slightly heavier second and third coat.

What’s nice about the Vallejo paints is they are water-based acrylics and be cleaned with water. However, for cleaning your airbrush, I recommend using an ammonia-free glass cleaner. It clears out the paint without hassle.

Once you’ve painted your base colors, spray a lighter color (the base color lightened with a bit of white works) in the center of panels and other parts. This brings out the individual panels and adds depth to your Star Wars model kit. For this process, you can switch to a smaller airbrush nozzle (.15mm) and turn the pressure down to 20 psi for better control and less overspray.

After painting Star Wars model kits, seal them with clear varnish. If you plan to add decals and washes, you’ll want to use a gloss varnish, like this Vallejo Mecha Varnish (No. 27.701). Let the parts dry overnight before handling and reassembly.

Waterslide decals and accenting panel lines will make any model kit look 10 times better. Some of the decals provided will change the look of entire panels, so if you decided not to paint, they will still improve the appearance of your Star Wars model kits.

To apply decals to your Star Wars model kits, you’ll need a dish of warm water, a sharp knife or scissors, and tweezers. Cut out the decal, leaving a little margin of backing paper around the design and drop it into the dish of water.

Decals for Bandai Star Wars model kits are thicker than other brands, but they lift easily from the backing paper. When you can move the decal on the backing paper (about 10 seconds or so), slide the marking onto the surface of the model with tweezers.

Make sure the decal is aligned in the right space; apply a little water to the surface of the model kit with a soft paint brush and reposition it. Roll a cotton swab over the decal to squeeze out air bubbles and excess water.

Brush on a generous amount of decal solution, like Vallejo Decal Softener (No. 73.212). There are many brands of decal solution, but they all soften the decal film and help it settle onto the model’s surface and into and around details to hide edges and give it a painted-on appearance.

To apply a pinwash to panel lines, the quickest way is to use Tamiya Panel Line Accent Color. Essentially an extremely thin enamel paint (also called a wash) that includes a fine-tipped brush in the bottle, just touch the brush to the end of a panel line and let capillary action pull the paint into the detail. Excess can be cleaned up with a cotton swab dampened with turpentine or mineral spirits.
For a more realistic but subtle look, use Black (No. 87131) around blue or green parts and Brown (No. 87132) near red or yellow panels. As for white areas, Light Grey (No. 87189) works well. If you want more contrast or a more cartoony look, use black on everything.

Finally, add a bit of weathering for realism to your Star Wars model kits. That can be as simple as using black and dark gray pastels to add soot to areas like the thrust nozzles. Pastels are easier to apply for novices than pigments, and you can get a set for a variety of colors.
The B-wing starfighter is done! You can use the same techniques with any of the Bandai Star Wars model kits—and Star Wars model kits from other brands, too.

Star Wars has become perhaps the most popular and well-known entertainment and pop-culture franchise in history starting with George Lucas’ movies in the late 1970s and early ’80s and spawning more movies, TV shows, and toys and other merchandise, including scale model kits.
Various companies have produced Star Wars model kits over the decades since the first movies, including brands like MPC, AMT, Revell, FineMolds, and Bandai. If you’re building your first Star Wars model kit or you’re an old hand, Bandai kits are a good choice. Well known for its Gundam and other pop-culture plastic model kits, Bandai Star Wars model kits show a great attention to detail, excellent engineering, and easy assembly.
