Kit: No. 32001
Scale: 1/32
Manufacturer: Encore Models, available from Squadron, 877-414-0434, www.squadron.com
Price: $69.99
Comments: Injection molded, 162 parts (80 photoetched), decals
Pros: Great value; highly detailed; prepainted photoetched metal; resin or plastic figure
Cons: Difficult construction; fussy fit of lower wing
Issue published: July 2009

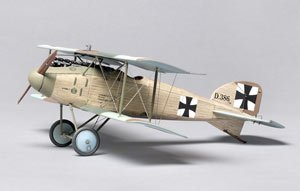
Encore Models’ multimedia, 1/32 scale Albatros D.II is a real boxful of goodies! The kit comprises 91 well-molded tan plastic parts, with sprues from the Roden Albatros D.I and D.III, as well as four white-metal interplane struts and two photoetched-metal frets (one prepainted) that look as if they come from Eduard. Also included are two film-strip windscreens, parts for a Mercedes D.III engine, a choice of cheek or wing-mounted radiators, and cast resin for a nicely sculpted figure of Oswald Boelcke (tutor to Manfred von Richthofen). The figure also appears in plastic on sprues. I picked the plastic version because it is easier to paint.
Parts notably lacking in the somewhat pricier Roden 1/32 scale Albatros kits, such as perforated machine-gun jackets, seat belts, instruments, etc., are included. The 16-page color instructions are well done, with parts maps, clear assembly steps, color views for three schemes (one for Boelcke and two for von Richthofen), even an antiqued copy of Dicta Boelcke, Boelcke’s rules for aerial combat. Two of the aircraft have varnished plywood fuselages, while one of von Richthofen’s has a red fuselage and tail. Directions suggest using Aero-Master’s wood-grain decal sheet for finishing the fuselage, which I did.
The build is neither quick nor easy. The interiors of the cockpit and engine compartment are highly detailed, though most of the bulkhead detail in the engine compartment isn’t seen after the fuselage is closed up. Part 23K had to be repositioned to sit right. I used Tamiya’s light gray surface primer for most parts other than the fuselage, which I painted with Polly Scale doped linen ahead of the wood-grain decal. I painted the flight surfaces with Mister Kit Albatros pale blue, pale green, green, and red brown acrylics.
The kit decals went on well with Micro Set and Micro Sol solutions. The wood grain decal is the best I have seen, and the panels fit well on the fuselage; however, they are thick and need Solvaset to settle, which dulls their high gloss. I spent a day and a half on the fuselage decals. The lower wing must be trimmed to mate with the fuselage, and a good deal of test-fitting was required.
The struts and landing gear legs are accurately thin, and thus flimsy and fragile. This necessitated using a stand and jigs to assemble the upper wing and its struts. Foam-board jigs with rubber bands supported the upper wing at the right height and position so the cabane and interplane struts could be added. I had to notch the exhaust pipe to clear the right cabane strut.
After this assembly was secure, the model was supported on the upper wing and the landing gear legs were added. Instead of the plastic spacer bar, I used a brass wire. The steel “X” wires were the right size, making the landing gear much more able to support the weight of the model. I used thread to help secure the axle.
Twisting fine copper wire around a pin produced small eyelets for anchoring the rigging line at the base of the lower wings. The rigging instructions are wrong; the flying wires should be equidistant from the interplane struts, not next to each other at the lower wing root. I tied Aeroclub’s silver elastic rigging line to the eyelets and strut ends, and used fine steel wire for the elevator and aileron actuator lines.
Bravo! to Encore: I spent more than 80 hours building this exquisite kit, and I recommend it to experienced modelers.
Read more model kit reviews.


