SEARCH FINESCALE.COM

Enter keywords or a search phrase below:

Moebuis 1/35 scale Jupiter 2

The Robinson family’s famous ride gets its due in a 1/35 scale kit from Moebius. Now, where do I put the Chariot?

RELATED TOPICS: SPACECRAFT | SCI-FI / FANTASY
Kit:No. 913 // Scale:1/35 // Price:$109.99
Manufacturer:
Moebius Models
Pros:
Impressive size; detailed interior; easy build
Cons:
Lots of detail painting; difficult to display interior
Comments:
Injection molded, 239 parts, decals
box
FSM-WB0710_26
FSM-WB0710_28
FSM-WB0710_29
FSM-WB0710_30
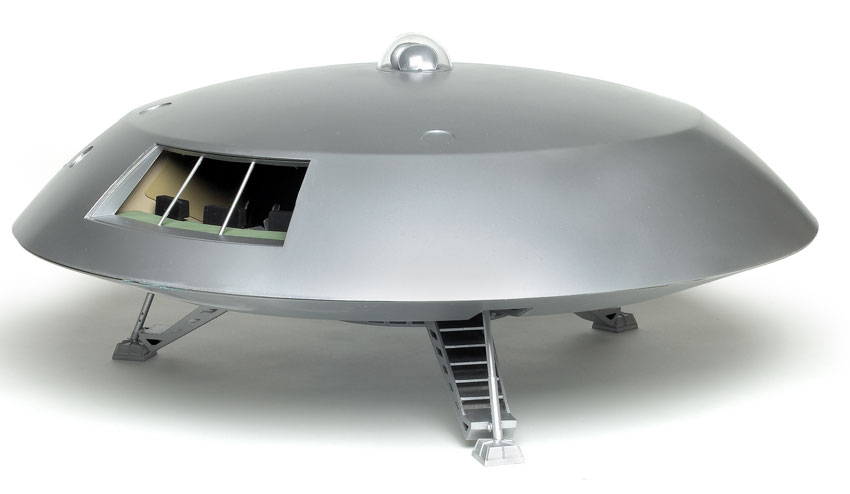
Continuing its release of exciting (and nostalgic) science-fiction subjects, Moebius presents the Jupiter 2 spacecraft from Irwin Allen’s 1960s television series “Lost in Space.” A huge molding in 1/35 scale, the kit features a detailed interior. As in most TV productions, several models were used to represent the ship, and the sets were updated as the show progressed. Moebius based its interior on the third season’s main command level.

The main saucer is well molded in upper and lower halves. While extra care is taken in packaging to protect the kit’s abundant clear parts, the locating pins for the command console on my main deck were broken off.

A large decal sheet provides many details for the interior. Moebius’ full-color instruction booklet is a big help in painting the model. It’s a bit of a struggle to install the landing gear legs in their bays, but once done, the final assemblies are very sturdy.

I started my Jupiter 2 with the biggest hurdle – painting those large saucer pieces natural metal. It’s been a while since I used rattle cans to spray a model, but I got an acceptable finish using Tamiya’s bare metal silver (No. AS-12). While the saucer dried, I started assembling the landing gear legs. I wanted to fill the small gaps at the base and on the underside of the legs, so I removed the pins for the leg struts (parts 9) and replaced them with styrene rod.

The interior support beams are molded in halves, leaving a nasty seam on the front of each piece that I covered with .010" styrene strip. On the TV sets these edges were backlit sheets of translucent plastic, so before painting the beams the base color I masked them to leave the unpainted white plastic showing to represent this feature.

The bulk of the work in building the Jupiter 2 is painting the interior components. I’m not fond of Moebius’ method of calling out paint colors by letter throughout the instructions, which requires constant referral to the paint guide. But if masking and painting small details is your thing, you’ll love the Jupiter 2. Take time and care and you will be rewarded with very attractive interior. The decals are thin and fairly robust, but a bit brittle. You will want to trim off the excess film from most of them so they fit their locations properly.

Assembly of the interior was relatively easy. I drilled a couple of holes where the floor pins for the command console had broken off, and used self-tapping screws to mount it in place. It only took a few hours, and everything slotted in place as it should. The only difficulty I had was installing the freezing-tube floor units (parts 100 and 104). I had to bend down the ends slightly where they fit into the wall unit.

Sadly, with the top saucer installed you can’t see much of the interior. You could leave the top unglued so you can open up the model to display the interior, but this also exposes the unfinished parts of the model.

Nonetheless, the model is an excellent reproduction of this science-fiction icon. Watching a few episodes of the show confirmed that Moebius effectively captured the essence of the command-deck sets.

I spent nearly 32 hours building my Jupiter 2, with about 80 percent of that time for painting. Several aftermarket products have already been released for this kit, including photoetched-metal details, painting masks, improved decals, and interior lighting kits. Intermediate modelers will be able to produce a good looking representation of the Space Family Robinson’s ride, while adventurous experts will have ample opportunity to superdetail a brilliantly lighted masterpiece.
9
JOIN THE DISCUSSION
Read and share your comments on this article
COMMENT ON THIS ARTICLE

Want to leave a comment?

Only registered members of FineScale.com are allowed to leave comments. Registration is FREE and only takes a couple minutes.

Login or Register now.
9 COMMENTS
Added 10 years ago
MARK DOBZYN
No,
Aurora never made this kit at all!
Added 10 years ago
MARK DOBZYN
Great kit very detailed upper level interior 18 inch replica and accurate profile of the hero miniature 4 ft version prop. The main color is a silver textured color for the ship. However, being a mere 1:35 scale interior some what of a pain in the butt to paint in two tone paint scheme & detail out correctly. Fun to put together and build a pain to paint all the scaled down interior parts and control walls and 8 main wall beams and 1 piece ceiling soffit.

Painting and detailing my second one and this time I want to get every detail just right.
For example the main control foward console flight deck is a very light green. If you don't believe me check out the Viewmaster Lost in Space reels 21 picture series with viewer for proof. It shows a portion of the flight deck while Professor Robinson is out side the J2 trying to grab the B-9 Robot with a magnet. The inside dark film clip shows the true color of the flight deck as a very light colored cream green. I used Krylon Fusion spray paint #2335 Honeydew Ambrosia for the piece. If not the actual color, its pretty darn close to it. Raf flat interior green is good too I think but, a bit dark for this scale and size of miniature model.

The main control walls appear to be a flat sand or a light flat beige color per the view master reels.
The main flooring is 2 tone. Outer area dark brown or burnt umber color inner floor sand/beige testers or dark tan color, or taupe color.

The circuit wall bank pannel area is either armored sand or Raf interior green color. I believe the first section only.
But, the whole section could be a green color sage I think. I matched it to The Lost in Space photo book which came out in 1998 and Ace Hardware custom spary paint matched the piece shown to a tee! Ace premium enamel SAGE #1196435 Gloss spray paint.

I'm not sure about the ceiling color though. If anyone has any ideas or has research to contribute please do so for all modelers benefit.
regards,
Added 15 years ago
JOE WITTMER III
I don't care what any one says,I'm a si-fi junkie and this kit is a must have for me.
Added 15 years ago
JOHN B MORGEN
Is this kit an old Aurora kit from the 1970s?
Added 16 years ago
RICHARD SENSALE
You're right about the living quarters level. There was also an engineering level they showed in a few episodes. It looks bigger inside than the ship. I love LIS, but you had to stretch your imagination quite a bit sometimes. I actually have two kits. One is the original Polar Lights kit, and the newer Polar Lights pink box kit. The older one I bought as an open box on Ebay and I believe it may have the lower living level. Mobeus makes some great kits, if a bit expensive, and I hope that someday they cut their prices so my Daughter can afford their kits.
Added 16 years ago
LEO O GABALDON
I know that the model isn't in amy way realistic to both reality or the series but it sure does take me back to my youth. When dreams sometimes were a boys hope for the future. I love it.
Added 16 years ago
RONNIE M RUTHERFORD
Actually, in the TV series a lower living quarters floor was installed on the set. Physically, it couldn't fit in the space provided for the JII model used in filming but through the magic of Hollywood and certain warping of time and space, a full bunk space and toilets were provided for all of the crew. Dr. Smith slept on the floor! Certainly no room for family expansion was planned. Especially since this was supposed to be a search for future space for mankind.
Added 16 years ago
LEON OLIVIER JR
Danger Will Robinson! This model looks great and brings back lots of childhood memories.
Added 16 years ago
JOHN WOOD
No toilet, no shower, no stove or female hygeine unit - a very unrealistic model...
FREE DOWNLOAD

FREE DOWNLOAD

Essential finishing techniques for scale modelers.

FREE NEWSLETTER

By signing up you may also receive reader surveys and occasional special offers. We do not sell, rent or trade our email lists. View our Privacy Policy.