Right out of the gates: This is the best “fullback,” Merlin-powered Mustang in 1/72 scale — possibly in any scale! Arma Hobby is a relative newcomer to plastic model hobby, but this Polish company is producing quality kits that rival long-standing leaders in the industry.
Arma’s Mustang features the finest recessed panel detail and excellent cockpit equipment, including separate radios and choice of two seats. Outside, you get a choice of fins: standard and with the leading-edge strake. Clear parts include camera windows for the F-6C, along with closed and opened versions of the standard canopy and the retro-fitted “Malcolm” sliding hood. Separate flaps are intended to be in the dropped position, but you can clip off the attachment tabs and raise them if you like.
Options include three sets of lower-nose “breathers,” paper or metal drop tanks, and 250-pound bombs. There is also a choice of exposed or hooded exhaust stacks. Photo-etched metal (PE) parts are provided for the seat harness and grilles for the under-fuselage radiator. Decals are given for six Mustangs, including four American, one RAF, and one RAAF. One American aircraft has an option of overpainted Japanese hinomaru after its capture in China.
The well-detailed 27-step instructions require careful study to understand the positioning of the available detail parts. Step 1 erroneously shows the frame posts of the armored seat back going into depressions in the cockpit floor too far forward of where they should go. This will cause the seat to sit over the mounting hole for the control stick. The armored plate should be placed against the raised portion of the cockpit floor and is shown correctly installed in Step 2 and 3.
Small illustrations in Step 2 show optional arrangements of the fuel tank, radios, and equipment. Arma even provides tiny labels and stencils for these items and many more on the cockpit sides. Decals also decorate the instrument panel and the PE brass seat harness. I’m not a fan of PE parts, and I found that placing the decals without the PE are sufficient in this scale. In fact, I used none of the dozen PE parts in this kit. The others are grilles for the radiator and intake — all but invisible when the fuselage is closed. Two large molding pins must be removed from the radiator floor insert (Part A30) to allow it to fit.
Once the interior is finished, the real fun starts. The fit of the three-piece wing assembly is outstanding, and so is its fit to the fuselage. However, I found the plastic so soft that even cutting with a brand-new parts clipper they left substantial divots that required filling.
Arma provides a separate windscreen, a set of closed or opened standard canopy, and two Malcolm hoods (one slightly larger to fit over the rear fuselage in the opened position). Separate slide rails for the Malcolm hood come attached to the lower rim of the canopy. Full disclosure: I completely forgot about using the kit’s pre-cut vinyl masks for the canopy framing and wheels. Doh!
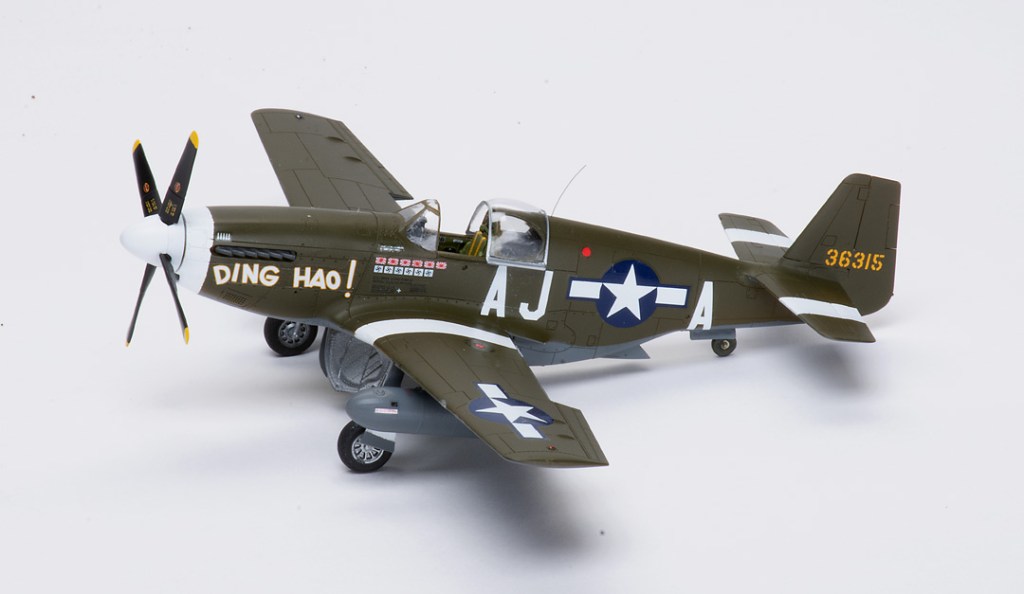
I painted my model with Gunze Mr. Color lacquers then used the perfectly printed kit decals for James Howard’s “Ding Hao!” (By the way, photos of this aircraft show it with either the standard or Malcolm canopies.) The decals laid down beautifully.
I spent 23 hours on my P-51. It was slow at first because of all the interior detail, but quickly accelerated with the excellent fit of the major assemblies. Wow! What a kit! Arma has announced a bubbletop P-51D coming, too! Tamiya: Check six!


