For one of the most iconic U.S. Navy jets ever, the F-14 Tomcat, I think we can skip the introduction and get right into it.
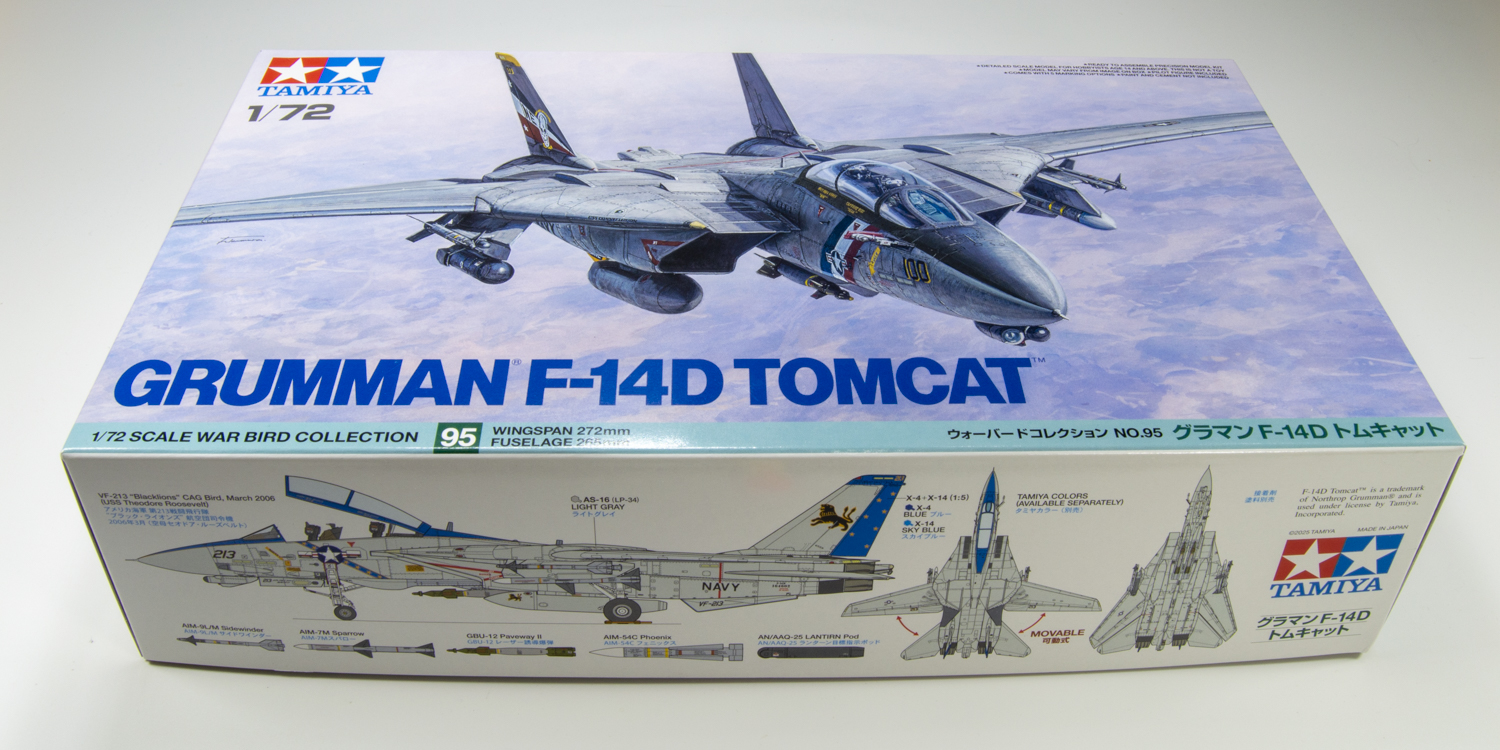
With so many kits available for the F-14 in 1/72 scale, you might wonder what a new kit will bring that is so much better, until you get your hands on the Tamiya 1/72 scale F-14D Tomcat plastic model kit. My first thought: “Wow! That’s a big box with a lot of parts for a 1/72 F-14!” Closing in, you’ll see the typically fine molding and detail emblematic of Tamiya kits. Also, you’ll see that some of the high parts count comes from pieces included for multiple display options. The parts breakdown incorporates clever engineering that enhances details and eases finishing subassemblies.
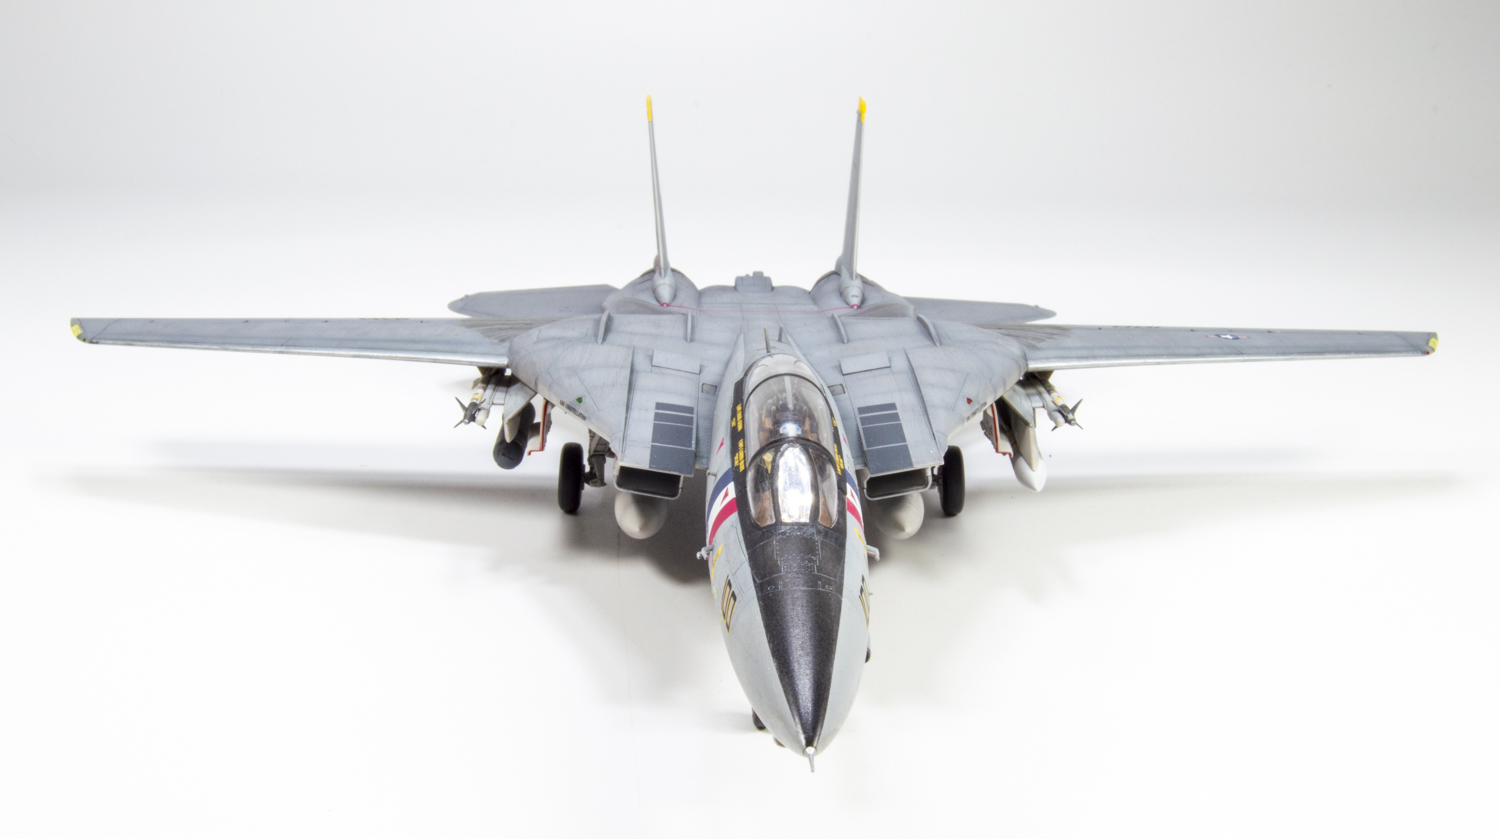
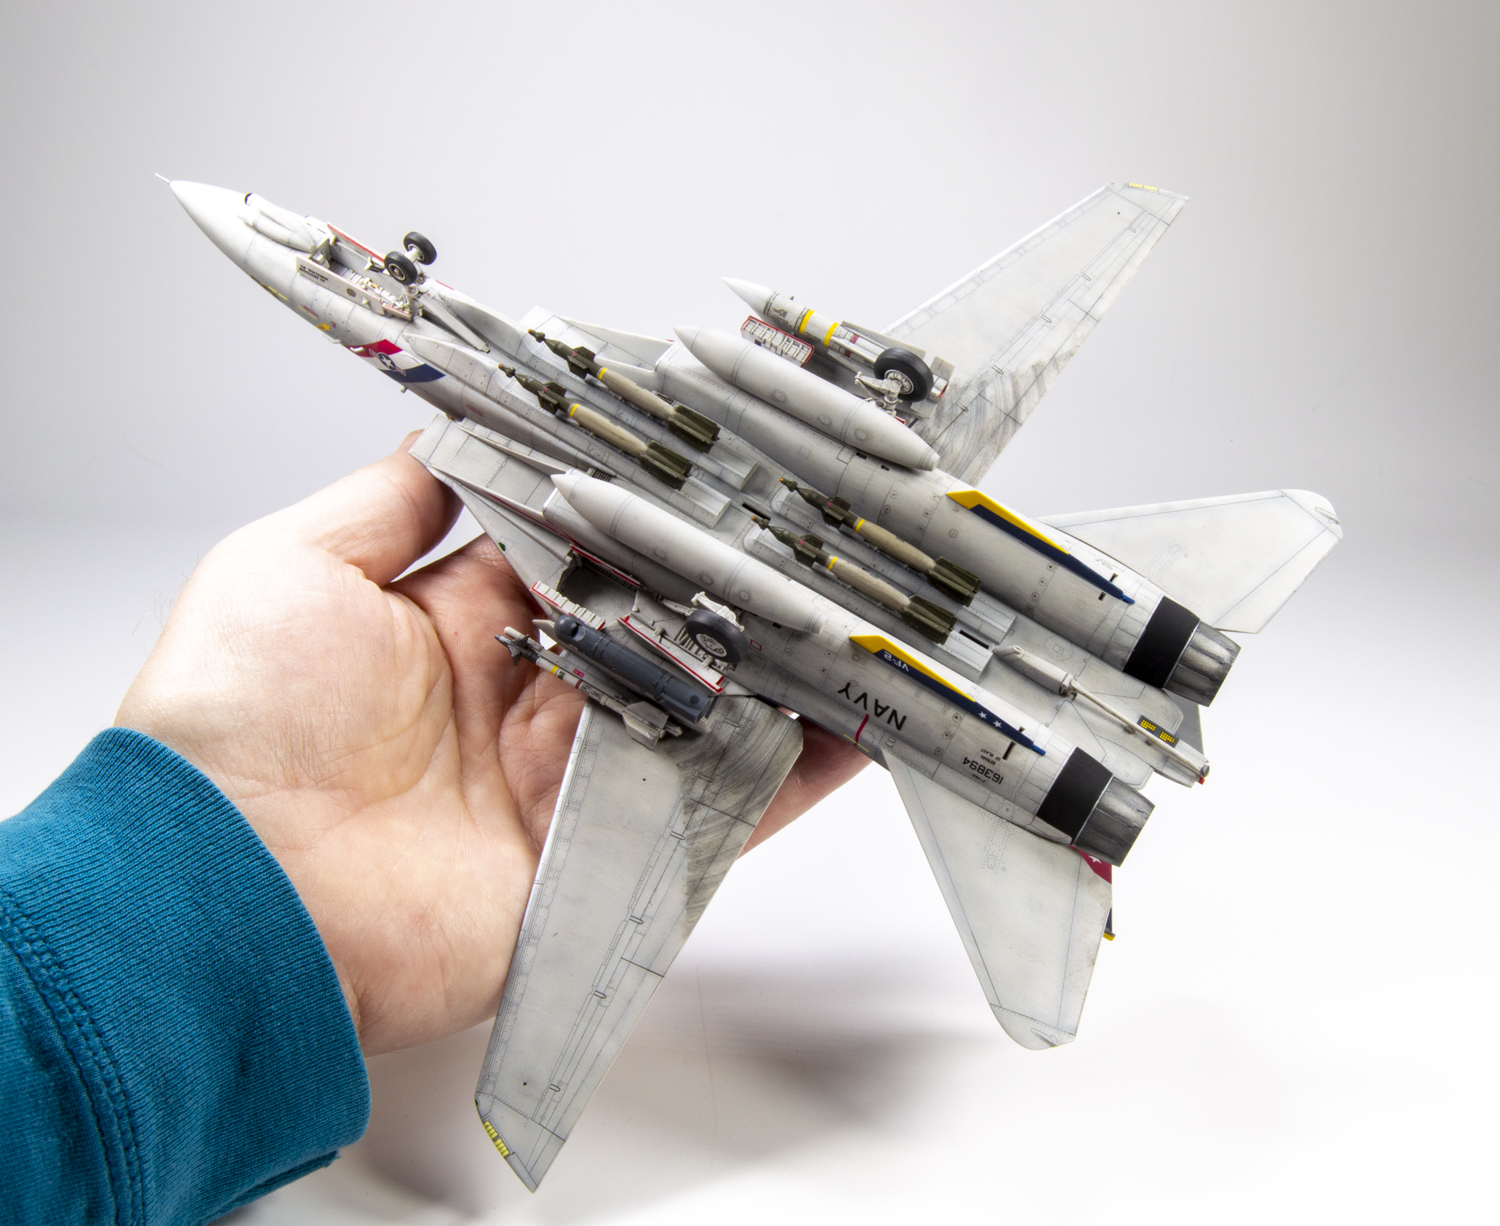
This kit allows you to build one of five Tomcat variants and pick how you want it displayed. Choose before you start building. I wanted my F-14 loaded with ordnance, so I chose the VF-2 Bounty Hunters squadron aircraft shown on the box. To display it ready for launch, I’d place the excellently detailed pilot figures in the cockpit.
The cockpit went together without any issues. The separate parts for the control panels made applying the decals easier. With a little Mr. Mark Setter, the decals conformed nicely to the raised details, providing a better outcome than I could have achieved by trying to brush-paint them.
After the cockpit, I bounced around cleaning up parts and building subassemblies to prepare for painting. Overall, the parts fit great, and I only used Tamiya Putty (Basic Type) mixed with Tamiya Extra Thin plastic cement to create filler to flow into a few small places that needed it. In most cases, the tiny gaps were my own doing from cleaning up parts. The moldings are in most cases precise, so take extra care when cleaning parts.
Raised and recessed ejector-pin marks on landing gear, gear doors, and on the GBU-12 bombs were easily removed with a hobby knife. I thinned down the ordnance fins and drilled out the back end of the Sidewinder missiles to improve their appearance.
Before joining the top and bottom fuselage halves, I recommend painting the center section of the top half black. There are openings in the central bottom part of the fuselage that you will be able to see into when the parts are joined.
Tamiya includes a masking sheet for the canopy and insides of the intakes. A nice addition to the kit, the shapes are fairly easy to cut out, although I would have preferred die-cut masks. Maybe I am just spoiled with the many available precut offerings you can get for a variety of subjects. I punched out the tiny circle (Mask M) with a punch set to cover the lens on the front fuselage pod. I can’t imagine trying to cut this out with a knife.
The kit also includes metal stickers. These depend on the aircraft you are building. I used one on the port side of the fuselage and think it is a great way to add subtle details that are variable from one aircraft to the next.
The canopy, wing fairings, and air bags are supposed to be left removable in order to provide options for display. I found it difficult to get a good fit for these parts without gluing them in place. I knew how I wanted to display the model, so I glued the appropriate parts.
I found the references to the various Tamiya paint products a bit frustrating. References are provided for spray paints, lacquer paints, and acrylic paints, but there is no information provided for how to achieve the colors using just one type of paint. In my case, I use Tamiya XF series acrylic colors, so I wish they would include references to mix the correct colors using the XF paints. I scoured my notes and mix references to come up with colors that are close. These mixes are as follows:
Dark Ghost Gray (No. LP-36) = 1 part Light Gray (No. XF-66), 1 part Dark Sea Gray (No. XF-54), and 3 parts Flat White (XF-2)
Light Ghost Gray (No. LP-37) = 1 part Sky Gray (No. XF-19) and 3 parts Flat White (No. XF-2)
IJN Gray (Yokosuka Arsenal) (No. LP-15) = INJ Gray (Yokosuka Arsenal) (No. XF-91)
The decals went down well over a coat of Tamiya Clear (No. X-22). I used Mr. Mark Setter and Mr. Mark Softer to settle them to the surface. After the decals were dry, I cut along panel lines and used a bit more setting solution to get them to settle better. The thickest areas with the most color printed on the clear film were the hardest to get down over details. I find Tamiya decals are often a bit thick, and I ended up wet sanding with 1500-grit sandpaper after a second coat of Tamiya Clear to blend them better into the surrounding areas. If you are going to choose a fully loaded display option, like the VF-2 aircraft, expect to spend a lot of time applying all the decals to the bombs and missiles.
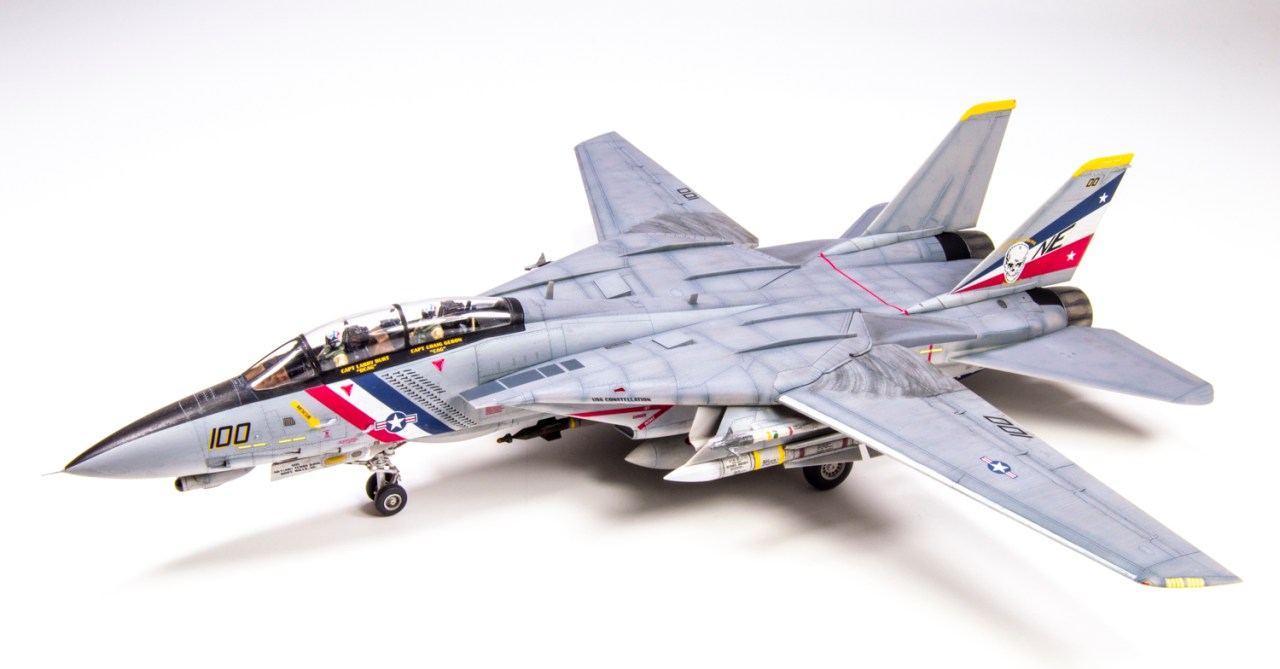
Tamiya has provided another excellent, state-of-the-art kit with its 1/72 scale Grumman F-14D Tomcat plastic model kit. It’s hard to argue with outstanding detail and lots of options for marking and display. I spent a little more time than I would have expected for a 1/72 kit of this size, but most of the extra time was spent on the decals and finish. While I am sure there will be many aftermarket updates coming for this kit, it is a top-notch right out of the box. I would recommend this kit for just about anyone. It can be built fairly easily and much of the work comes down to finishing. The finished Tamiya F-14 D is going to look great on the Italeri Modern Carrier Deck with the Reskit figures I already obtained to pose this bird ready for launch.